Tutorial 4 : How to work with Loom files created by ASAP
In this tutorial we will show you how to use the .loom files that are generated by ASAP.
What is a Loom file (.loom extension) ?
In ASAP we chose to store all the input and output data in Loom files.
This format is very convenient for many reasons, and even more for large scale data storage, such as single-cell data experiments:
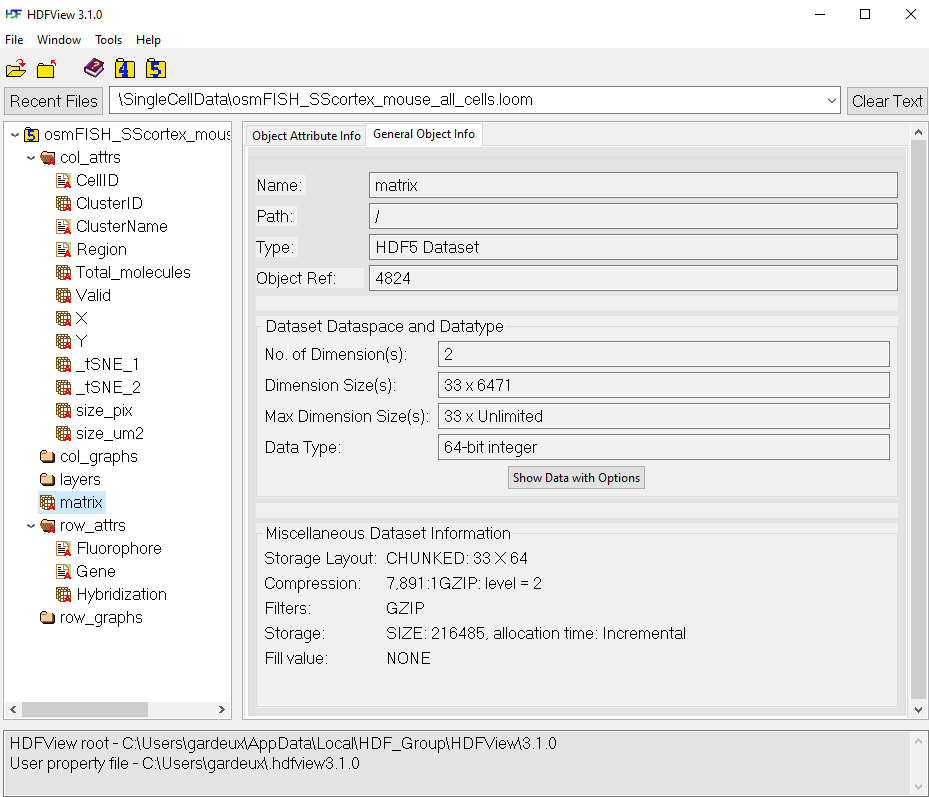
- All matrix/vectors/metadata datasets can be stored in a unique .loom file (see Figure 1)
- Matrices can be compressed and chunked, which allow to load into memory only part/chunks of the matrix in O(1). This is very efficient and allows for out-of-RAM computation, loading the matrix part by part.
- Most methods and tools (Seurat, scanpy, SingleCellExperiment, Scope, ...) are able to 1) directly load .loom files or 2) to convert loom files in a specific object that can further be processed in the respective pipeline.
- Many atlases (Human Cell Atlas, Fly Cell Atlas, ... directly provide datasets as .loom files
What types of .loom files are stored in ASAP ? How many are there in my project ?
The main limitation (currently) is that .loom files handle only ONE fixed dimension for matrices (in terms of nb of cells/genes).
This means that if you filter your main matrix (gene or cell filtering), you will have to create a NEW .loom file with the new dimensions.
That is the reason why, in the same project, a user can have multiple .loom files available to download (one for each matrix dimension).
For example, if you uploaded a count matrix of 10000 cells x 30000 genes, that you performed a cell filtering (keeping only 8000 cells) and further a gene filtering (keeping only 2000 genes), then you will end up with 3 matrix dimensions, and thus 3 .loom files:
- A .loom file (Loom1) with dimension 10000x30000 [Raw dataset]
- A .loom file (Loom2) with dimension 8000x30000 [Cell filtering dataset]
- A .loom file (Loom3) with dimension 8000x2000 [Gene + Cell filtering dataset]
This is important to understand, because, in our example, if a clustering is performed on the Loom3 dataset, it will only be stored in the Loom3 .loom file, not in Loom1 nor Loom2.
However, all the metadata that were present in a .loom file prior filtering, will be kept in the filtered .loom file.
Of note
Currently ASAP generates Loom v3 files, so if you use loompy/loomR to load the .loom into your workspace, check that you have the latest version (that can handle Loom v3)
How is stored the data in my Loom file ?
ASAP follows the rules of the .loom format specs, so we invite the reader to check this website for more information (also see Figure 1).
In brief:
- The main raw count matrix is stored at the root of the .loom file: /matrix
- The normalized/scaled/corrected matrices are stored in the /layers group (a group can be seen as a folder) in the .loom file: /layers/norm_matrix
- The matadata are stored in the /row_attrs or /col_attrs groups, if they are metadata for the genes or the cells, respecticely.
- What we call metadata are the "attributes" of the cells or the genes. For example, "gene names" and "is_variable" are metadata of the genes, and "cell name" or "cluster_seurat" are metadata of the cells.
- We can also store full tables as metadata. For example we store the DE results as a "nbgenes X 5 columns" metadata of the genes. The five columns are "log Fold-Change", "p-value", "FDR", "Average expression in Group 1", "Average expression in Group 2".
How can I use my .loom file and retrieve information from it ?
Retrieving information from the .loom file requires writing some lines of code. Since it is a HDF5 file, any programming language can be used, but for simplicity we recommend using loomR (R language) or loompy (Python language).
Here follows an example in R and Python to retrieve clustering results stored in the "/col_attrs/cluster_seurat" metadata:
R script for loading .loom file
# Load the library
require(loomR)

# Connect to the file
ds <- connect(filename = "my_loom.loom", mode = "r") # r for read-only and r+ for read/write

# Note: You may encounter the following error:
# Error in validateLoom(object = self) :
#   There can only be 5 groups in the loom file: 'row_attrs', 'col_attrs', 'layers', 'row_graphs', 'col_graphs'
# If this is the case, it is because loomR is not yet applicable to Loom v3 standards (that is generated in ASAP). As of today, this is the case (2020.04.14). Maybe later you will simply need to update loomR version.
# You will need to use the option: skip.validate = T
# e.g.
# ds <- connect(filename = "my_loom.loom", mode = "r", skip.validate = T)

# Retrieve the data and put in variable clusters
clusters = ds[["col_attrs/cluster_seurat"]]

# Close the file handle
ds$close_all()
Python script for loading .loom file
# Import the package
import loompy

# Connect to the file
ds = loompy.connect("my_loom.loom", "r") # r for read-only and r+ for read/write

# Retrieve the data and put in variable clusters
clusters = ds.col_attrs["cluster_seurat"]

# Close the file handle
ds.close()